What's new in Game Connect? (page 2)
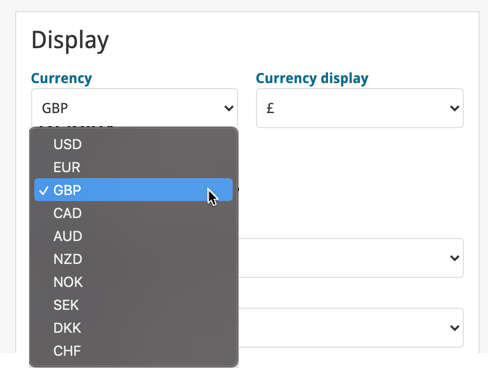
In October 2020, we introduced the ability to download the PriceCharting values in your own currency. Today, we take this one step further with new display settings for prices and values.
Find the new “Currency display” setting in your Settings screen:
Another big update for your Game Connect software.
This time we added a new feature that will save you lots of time:
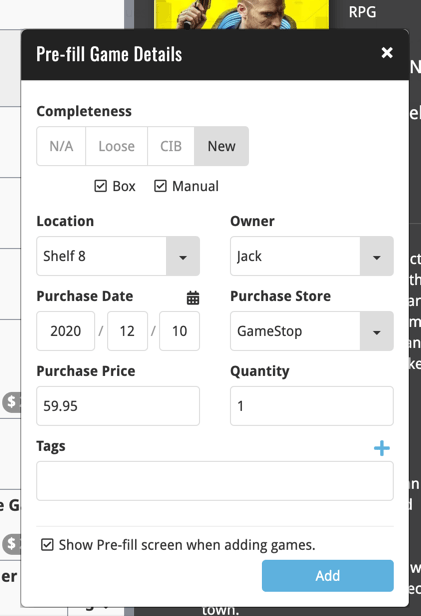
New Pre-fill screen that pops up when adding games
When adding a game to your database using the Add Games screen, it will now pop-up a new screen called “Pre-fill game details, letting you set various fields right then and there.
Fields available in the Pre-fill screen:
- Completeness (Loose / CIB / New)
- Box / Manual
- Location
- Owner
- Purchase Date
- Purchase Store
- Purchase Price
- Quantity
- Tags
No more need to edit your added games afterwards!
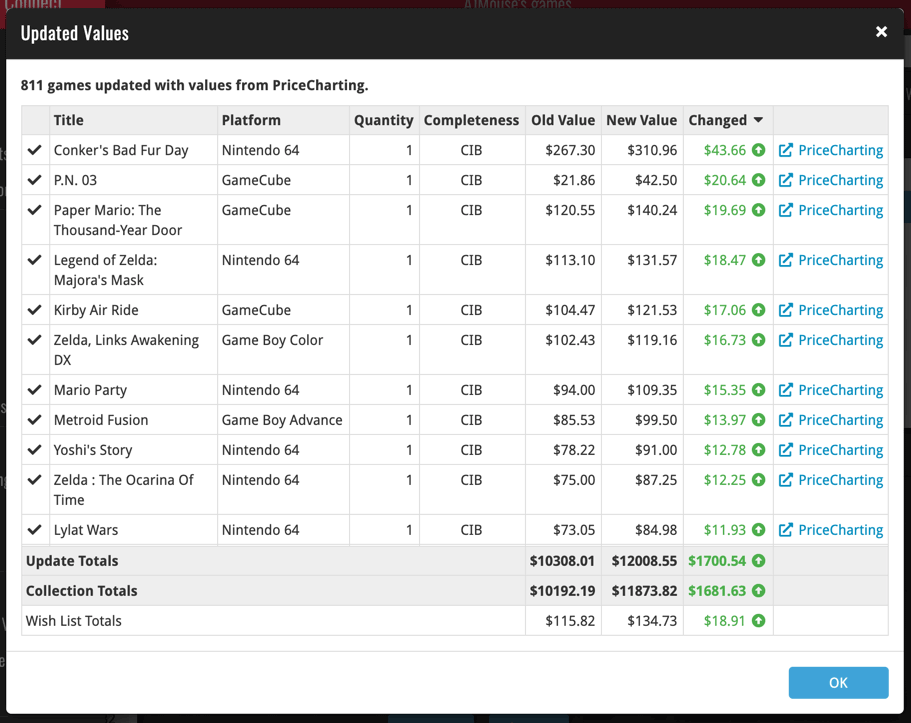
New “Updated Values” report after updating values from PriceCharting
Since we introduced the Update Values from PriceCharting feature, one of the most common questions we received at customer support has been:
After I update the values for my games, is there any way I can see which games have been updated?
So, after several years of having to say “sorry, no that is not possible”, we figured, let’s make it possible.
And of course, we went way beyond just showing which games have been updated. As of today, after you run Update Values, you will get a nice “Updated Values” report, showing you:
- which games have been updated
- their previous values and the new game values from PriceCharting
- the value change, in green when increased, in red when decreased
- links to PriceCharting.com to see further historic values
- total value changes for the updated games and for your entire collection
Today we’re bringing you a HUGE update for your Game Connect software!
The downloading of Loose, CIB and New values from PriceCharting is one of the most popular features of the Game Connect software. So for this big update, we decided to take this feature to the next level, with values for more games, new features and many improvements:
IMPORTANT: after logging in for the first time, you MUST run the new Update All Values feature to see values for your games again. The Update All Values command can be found in the menu, under Tools.
Values for over 25,000 extra games and editions
We started on this project 3 months ago, manually linking over 25 thousand extra Core game entries to the corresponding PriceCharting entries, including lots of new PAL and JP editions. A huge job, but now ALL games and editions that are listing on PriceCharting.com are linked to entries in our Core game database!

Now download values in other currencies
Use the Settings screen (choose Settings from the menu) to select your preferred currency for the game value and purchase price fields. Choose from USD, EUR, GBP, CAD, AUD, NZD, CHF, NOK, SEK or DKK.
Then run Update Values again to retrieve games values converted to your selected currency, using the current exchange rate.
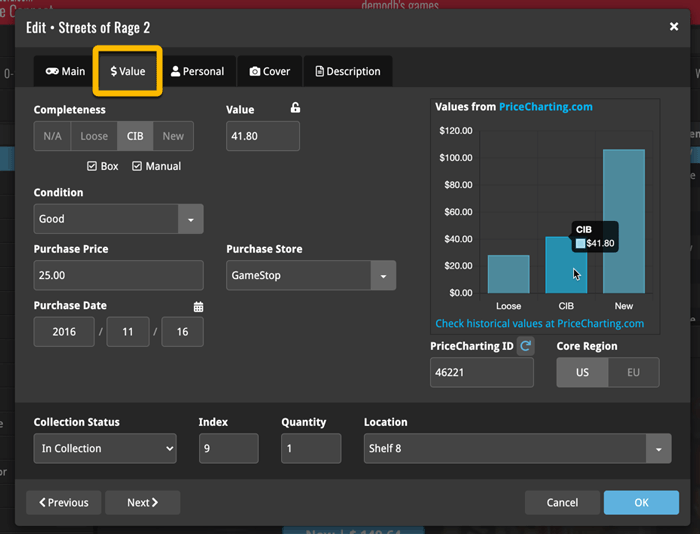
Edit Game screen, new Value tab
All Value related fields (Completeness, Box, Manual, Value, PC ID, Condition, Purchase info, etc…) are now on their own “Value” tab in the Edit Game screen.
New on this Value tab:
- A nice chart showing the PriceCharting values for Loose, CIB and New.
Tip: tab the bars in the chart to set your Completeness field. - PriceCharting values are now downloaded into the Value field (previously called “Current Value”). This way, you can now manually override (and lock) the value and always keep your Value Totals correct (in the Statistics screen).
- You can now manually override the PriceCharting ID. Useful for cases where our game entry is linked to the wrong PriceCharting entry and you did find the correct one on the PriceCharting.com site.
- The Completeness field now has an extra N/A option for digital games. This way you can ensure your digital games are not downloading PriceCharting values.
New: Update Values tool
Previously, Game Connect always showed you the most update values automatically from our Core. But starting today, the software actually downloads the PriceCharting values into your Value field, so that you have the option to manually override it.
However, that also means that you need to manually run the new Update Values tool (from the menu), to update your values with fresh data from PriceCharting.com, e.g. weekly or monthly.
Don’t worry, this Update routine is super-fast, as it updates your entries 100 games at a time.
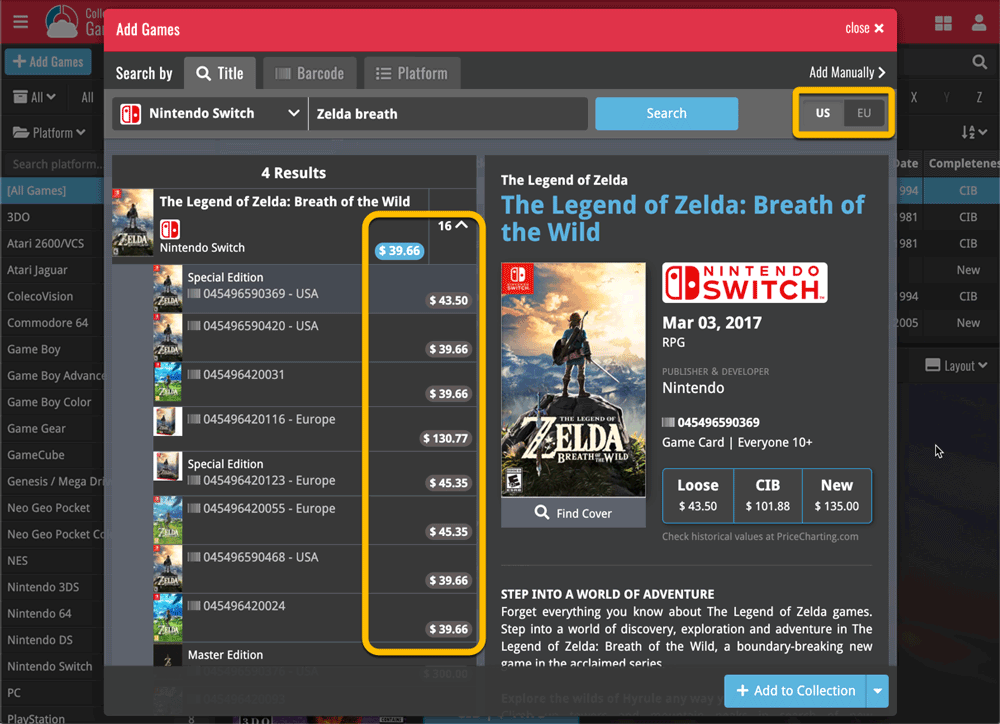
Add Games screen
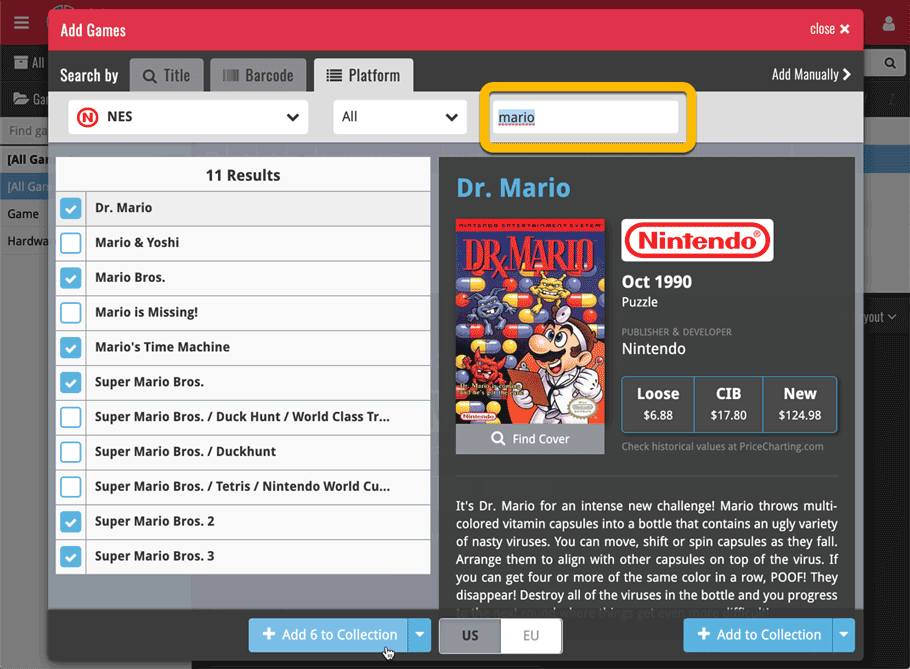
- In the Add Games from Core screen, you can now set a global US/EU preference for getting US (=NTSC) vs EU (=PAL) values and cover images (this replace the old “US default” and “EU default” entries under a game.
- Search results in the Add Games screen now show Edition, Region and PriceCharting values.
Last week we implemented several small improvements to the Connect software, based on suggestions (and complaints) from you all, our loyal users:
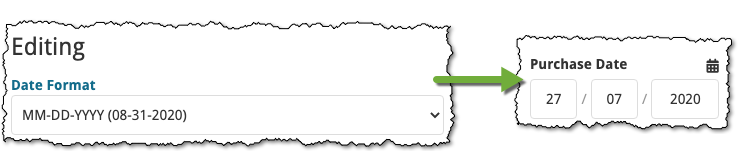
Configurable Date Format for Edit screen
Two months ago, we introduced a Date Format setting to control how dates are displayed throughout the Connect software. But the date editors in the Edit screen still always used “yyyy-mm-dd” as the format. Which could be confusing to some users.
So in the Settings screen, under Editing, we have now introduced a new setting, specifically for controlling the order of the year, month and day boxes in the Edit screen:
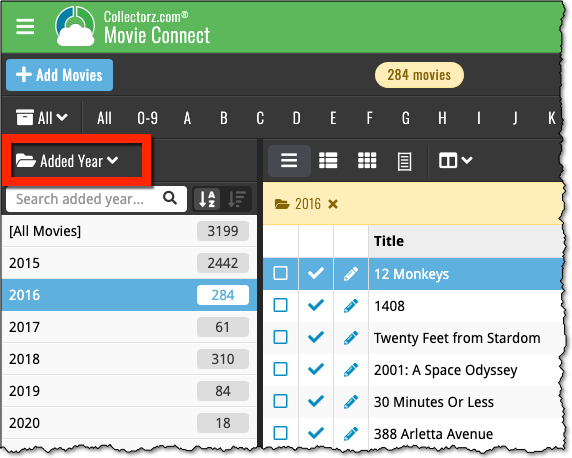
New “Year” options for folders, colums and sorting
Some dates were already available as Year-only options for folders, columns and sorting (like Release Year, Publication Year, etc…), but we have now updated the available options to include ALL date fields as Year-only options, for example:
- Added Year
- Purchase Year
- Seen it Year
- Read it Year
Improved Auto-Capitalization feature
Small tweak for the Auto-Capitalization tools: it now correctly auto-caps letters that follow a parenthesis, bracket, square bracket, single quote or double quote.

More Totals in Statistics screens
The Statistics screen has been updated with more Totals at the top, e.g. for Purchase Price, Current Value.
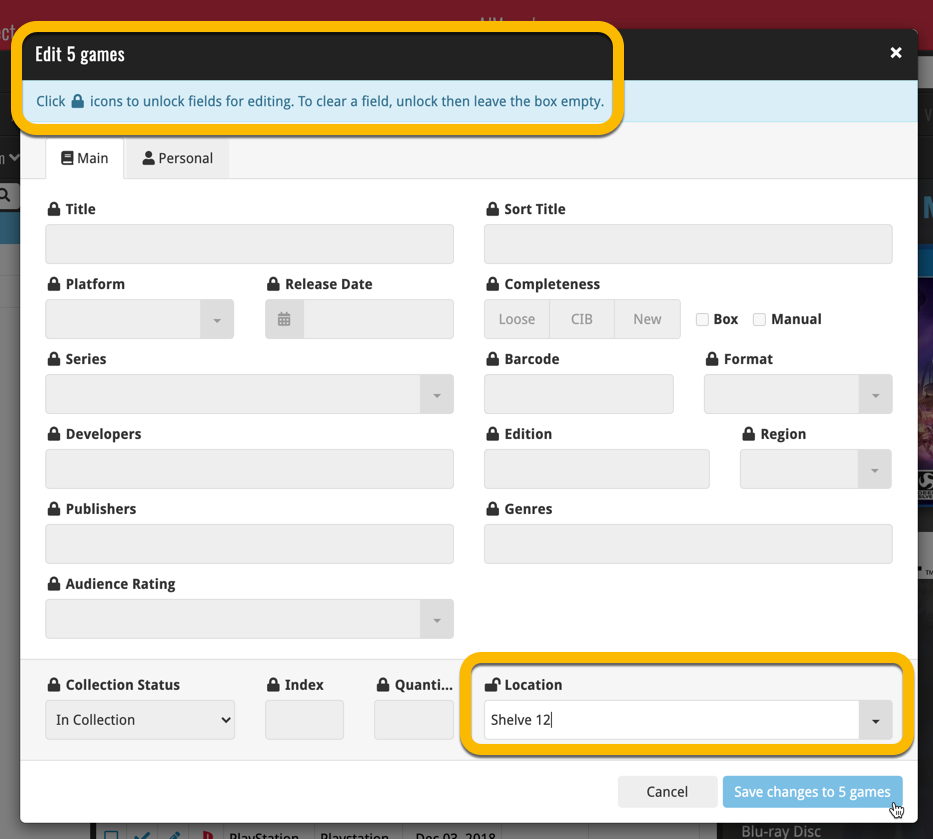
At customer support, we were regularly receiving questions about the Edit Multiple screen, so in today’s update we made several changes to make it clearer.
- The checkboxes (for unlocking fields) have been replaced by clearer “lock” icons. Click the lock icon to unlock a field for editing.
- Or, just click on a lock field and you will receive a popup asking you to unlock it.
- An extra notification at the top explaining the unlocking and clearing of fields.
- Save button now indicates the number of games that are being edited.
- Extra warning when saving “You are about to change data for 4 games. This can not be undone. Would you like to continue?”
Using “Edit Multiple”
Quick reminder how to use Edit Multiple:
In the main list, use the checkboxes to select some games, and click “Edit” in the blue action bar that appears above the list.
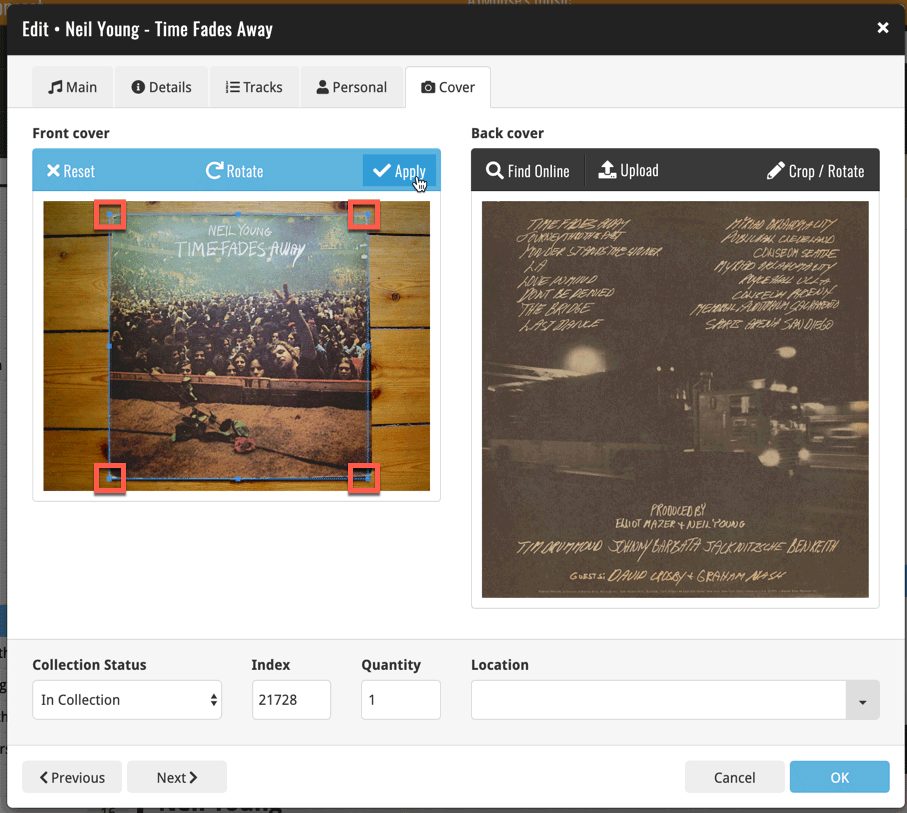
New in the Cover tab of your Edit screen: built-in Crop and Rotate tools for your cover images!
Super useful for fine-tuning images that you uploaded or found through the Find Online tool. You can even Crop/Rotate images that you received from Core, in which case they will be automatically turned into a custom image.
To use the new Crop/Rotate tools, open your Edit screen go to the Cover tab and click the “Crop/Rotate” icon on the top right above the Front or Back cover image:

Then:
- Click the Rotate icon to rotate the image 90 degrees to the right.
- Drag the blue crop rectangle to indicate your desired crop area.
- Click Apply to apply the changes.
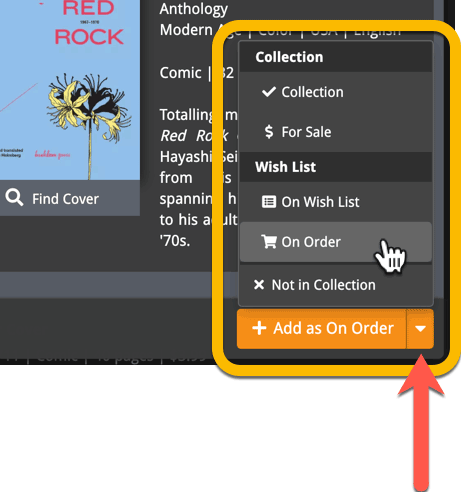
Previously, the “Add to …” button in the Add screen let you choose between “Add to Collection” or “Add to Wishlist”. But as of today, you can now choose from ALL possible Collection Status option directly. For instance, this lets you add an item as “On Order” straight from the Add screen!
Now, the possible choices are:
- In Collection
- For Sale
- Wish List
- On Order
- Not In Collection
A big update for Game Connect again, in which we introduce many new settings for further customizing your software to your own liking.
And while we were at it, we updated the Settings screen with clearer grouping and naming of settings.
Here’s what’s new:
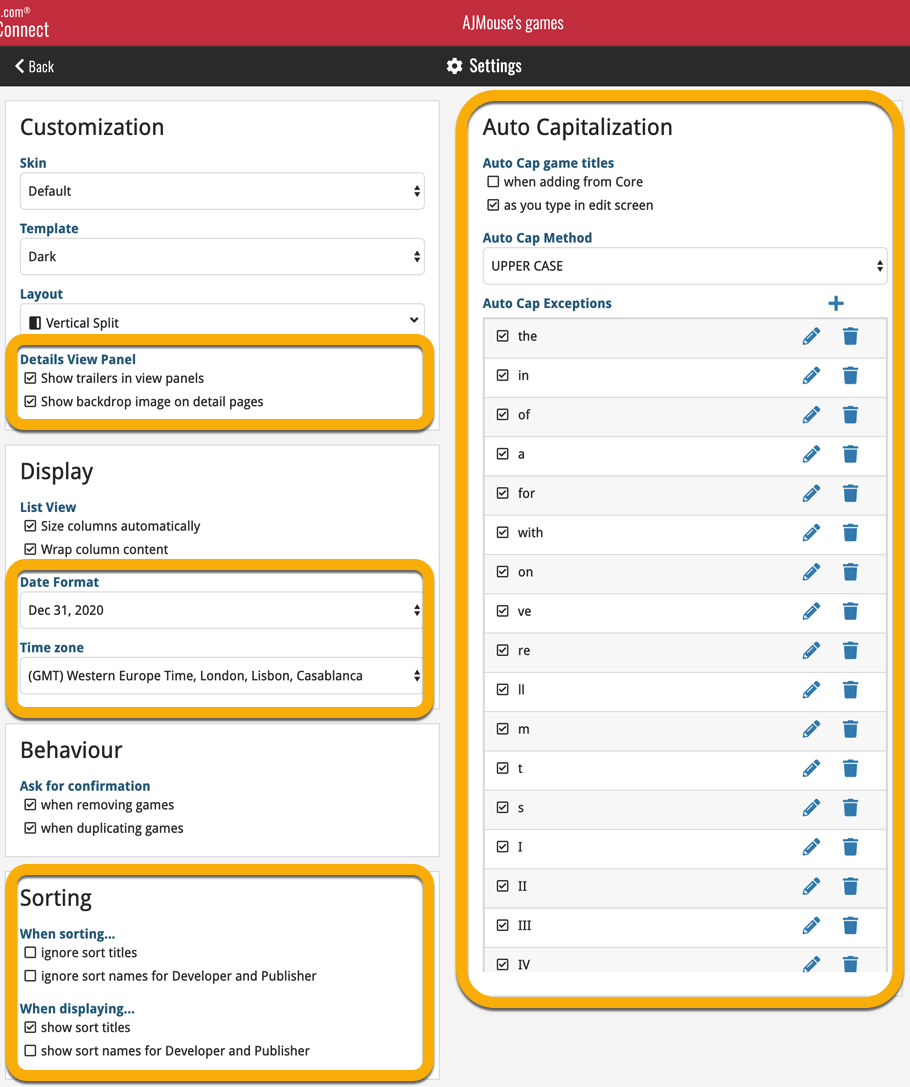
Auto Capitalization
This is a completely new feature, for automatically capitalizing your game titles.
Auto capping can be done:
- when adding games from Core. This is OFF by default as our Core delivers nicely capped game titles in general.
- as you type titles in the Edit and Add Manually screens, very useful when adding games manually
- by clicking the AutoCap (aA) button above the Title box in the Edit screen
The Settings screen lets you choose between 4 Auto Cap methods:
- First Letter of Each Word with Exceptions
- First letter only with exceptions
- UPPER CASE
- lower case
The Auto Cap Exceptions list comes pre-filled with a sensible list of common exceptions, but is completely user configurable.
Date Format
Choose how date formats are displayed throughout Connect.
Timezone
Choose your own timezone and all Date Added and Date Modified fields will be displayed according to that timezone. (previously these all showed in UTC time)
Sorting
Two new options that control the sorting by title and how titles are displayed:
- When sorting, ignore sort titles: check this if you prefer to ignore all sort title when sorting and just have the software sort on the regular Title field.
- When sorting, ignore sort names for Developers and Publishers: check this if you prefer to ignore all sort names when sorting and just have the software sort on the display name.
- When displaying, show sort title: when sorting by title, showing the actual sort titles that it sorts on can make your list a bit “easier on the eye”.
- When displaying, show sort names for Developers and Publishers: showing the actual sort names that it sorts on can make your list a bit “easier on the eye”.
Show trailers in Details View Panel
If, for whatever reason, you don’t like the trailer videos in your game details panel, switch them off here.
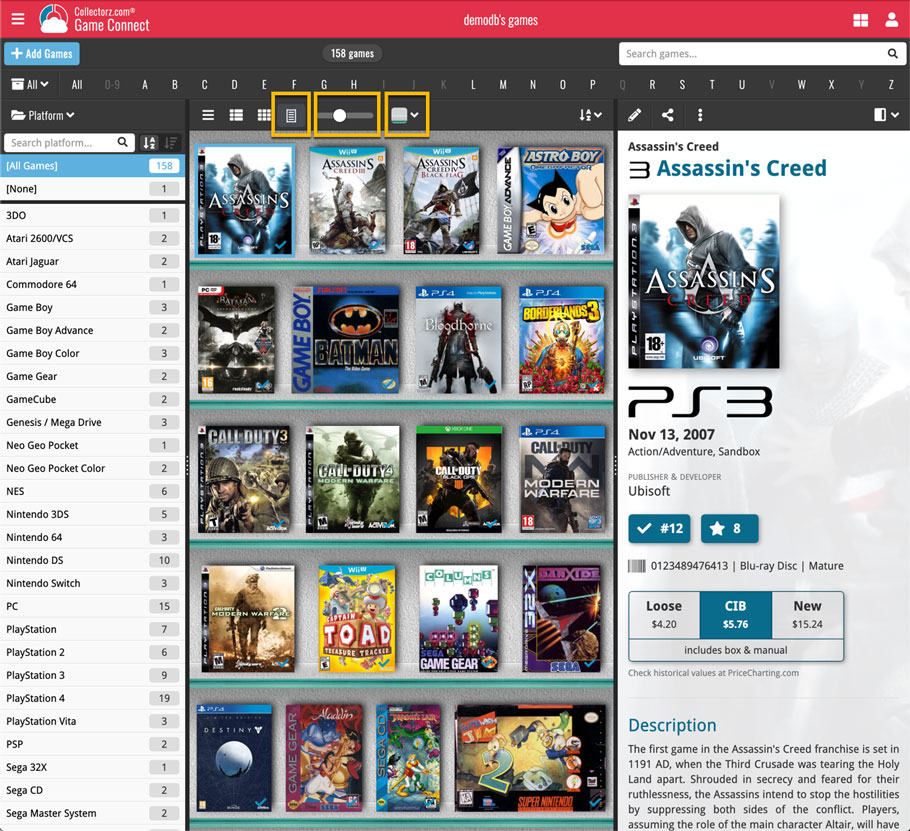
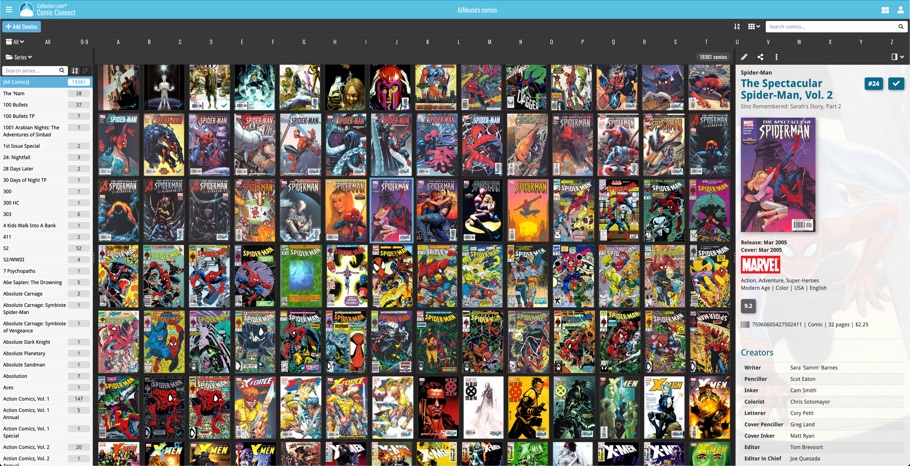
A very nice cosmetic update for your Connect software today: a new “Shelves View”!
Shelves View is a fourth view for your game list, similar to Cover View, but with your cover images standing on a nice shelves background. You can even choose between 6 different shelf styles using the Shelf Style selector:
- Wood Light
- Wood Dark
- Glass
- Metal
- Carbon
- White
Also new, for both Shelves View and Images View, as “Size Slider” to control the size of the images.
Toolbar tweaks
Because of the introduction of the new view, the Shelf Style selector and the Size Slider, we have also made several changes to the various Connect toolbars:
- A new “View” toolbar right above the list, with 4 buttons for switching between the 4 views (List, Card, Cover and Shelves), the Size Slider and the Style Selector (for Shelves) and finally the Sort Order button (on the far right).
- The new “View” toolbar replaces the “Filter” toolbar that was in that spot.
- The “Filter” toolbar now only appears when a filter is actually active, and now has a pale yellow background to make it super-clear that you are looking at a filtered list.
- The number of games indicator has been moved (back) to the center of the top toolbar.

It’s been a bit quiet with Connect updates in the past 2 months, as we have been preparing a *huge* update. BUT it is live now!
All settings are now saved server-side, in your CLZ Cloud
We have taken the advantage of the Connect web-based software to the next level, by storing all your settings on the server side, your CLZ Cloud (instead of in local browser cookies).
So any computer or device you log in to will automatically have the same folder option selected, the same columns selected for the list view, the same sort order, the same layout, etc..
Connect now even stores your Add screen’s barcode queue on the server side, so you scan barcode into the queue on one computer and process the queue later, from any other device.
All your existing settings will be automatically transfered to the server, the first time you login.
BTW: this change finally resolves the problem of losing all settings for users who have their browser configured to remove all cookies on exit.
Create your own Favorites for Columns and Sort Orders
While we were working on the settings, we figured this was a good time to add some more customizability to the Columns and Sort Order features. You can now create and save your own Column and Sort Order settings as Favorites, then easily switch between them.
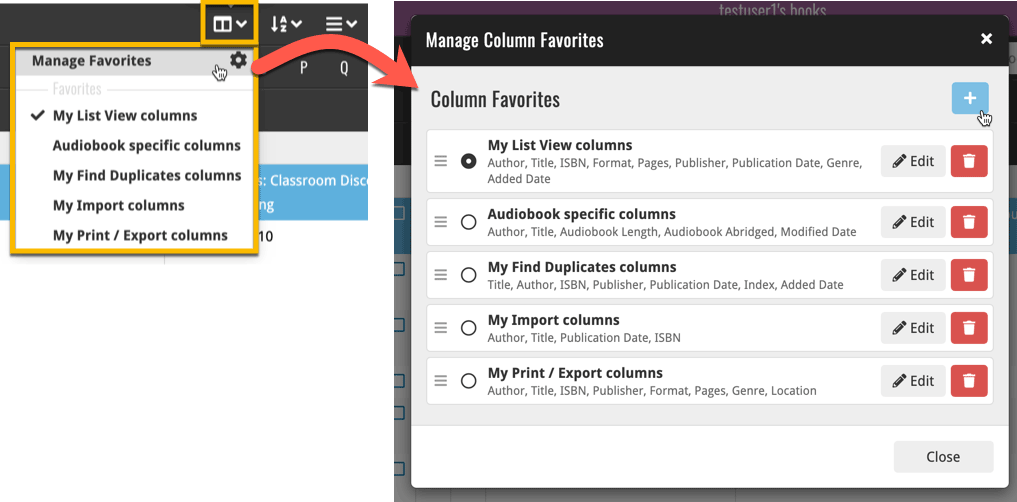
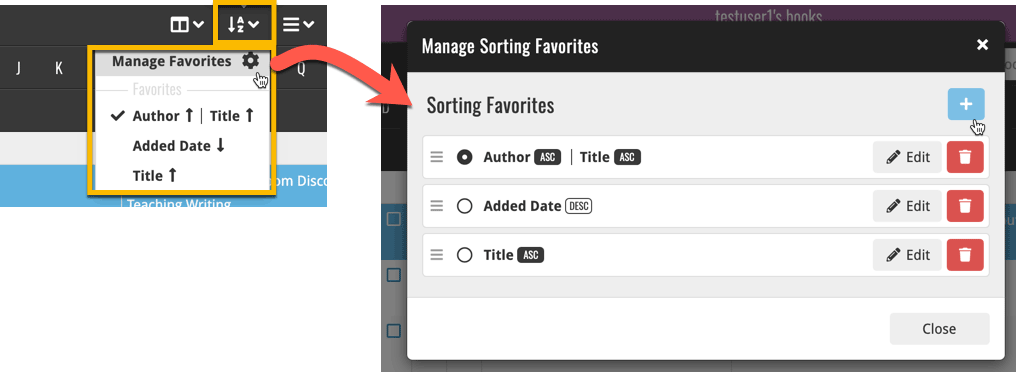
To create and manage your Favorites, click the Column or Sort Order button and choose Manage Favorites:
Manage Column Favorites:
Manage Sorting Favorites:
An old feature from the Windows and macOS editions, that somehow never made it to Connect: Re-Assigning Index Values. But now it’s available in Connect too!
What are index values?
Connect automatically assigns and increments index numbers to items that you add to your collection. The Index value is assigned when you add an item to the database. The next item you add to your collection will have an index number that is incremented by 1.
Index numbers are only used once. When an item is deleted, the next added item will still increment on the highest index number present in your collection.
New: Re-Assign Index Values:
With the new “Re-Assign Index Values” tool, you can automatically assign new and consecutive index values to all your items, according to a sort order you select, e.g. by Title, Release Year or your own Purchase Date.
To begin, click the menu top left and select “Re-Assign Index Values”. Now choose your desired Sort Order.
Please note that this action can not be undone!
![]() WebP is a new image format, developed by Google, that is producing smaller images compared to JPG and PNG, while preserving image quality. All modern browsers fully support the new WebP format so many websites are now using WebP for a faster browsing experience, consuming less bandwidth.
WebP is a new image format, developed by Google, that is producing smaller images compared to JPG and PNG, while preserving image quality. All modern browsers fully support the new WebP format so many websites are now using WebP for a faster browsing experience, consuming less bandwidth.
Of course, our Connect web-based software and the free CLZ Cloud viewer sites are quite heavy on cover images, especially in the Image and Card Views. So we figured switching to WebP could produce a nice boost in performance!
So today, we switched over and are now delivering all cover images and backdrops in WebP format, on all browsers that support it (older browsers still get JPG images).
You will find that your Image View and Cards View will load faster now. The difference is especially noticeable on slower internet connections and mobile devices (if you have a very fast internet connection, the difference will be minimal).
Noticeable on all connection types is the faster loading of the details panel after selecting a different item in your list. Because of the huge difference in the backdrop image sizes, viewing item details is now a lot snappier.
Enjoy!
Multiple small tweaks to your Connect software today, improving both the Edit Game screen and the Add Games screen.
Editing pick list fields: checkbox multiple values in one go
The Edit screen is where many users are spending most of their time, so we’re always trying to make your editing life faster and easier.
Today, we improved all multi-value pick lists fields (e.g. Genres, Developers) by letting you add multiple values in one go. In the Select Value screen we have introduced checkboxes now, that let you checkbox multiple values and add them instantly.
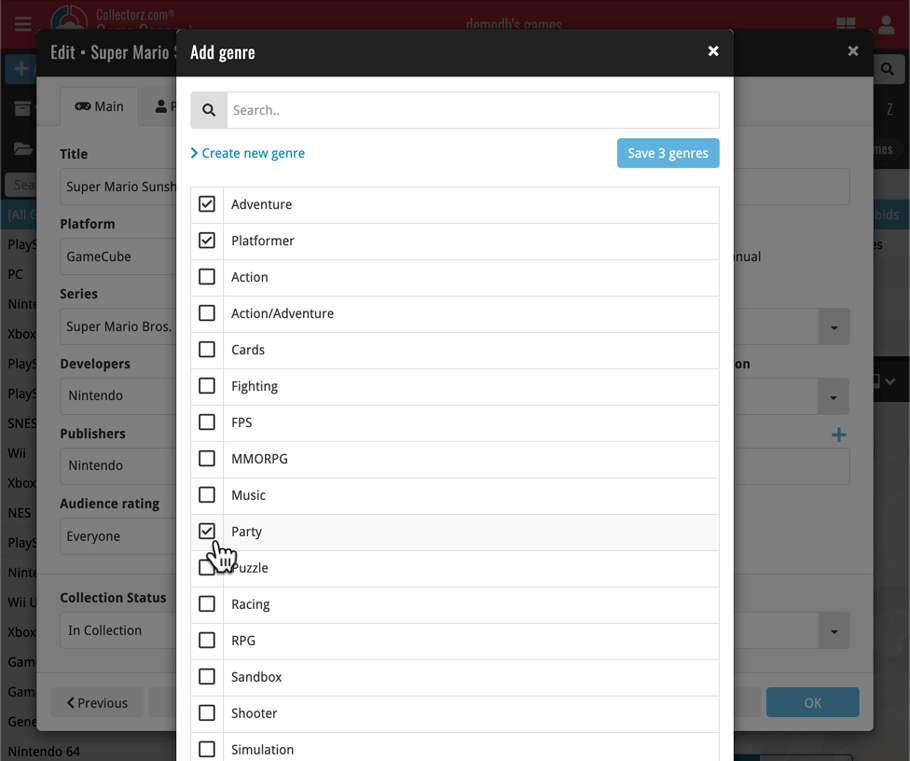
This is now available for the following fields:
- Developers
- Publishers
- Genres
- Tags
Adding Games by Barcode: instant adding to queue
Previously, when you searched by barcode (either by typing or scanning), the barcode instantly disappeared from the search box, but only appeared in the queue when the search was complete. Also with no “loading” indicator showing in the meantime. Not a problem when searches are instant, but it could lead to confusion in situations where it took a bit longer for the search to complete.
So we got to work and made it better: after hitting search, the barcode now instantly appears in your queue, showing a “Searching” indicator. This gives you instant feedback the barcode was accepted and is searching. Then, when the search has completed, the queue entry is filled in with the game details and cover image.
The above tweak also applies to the opening of the screen while you still had some barcodes in the queue. This saved queue list will now populate faster.
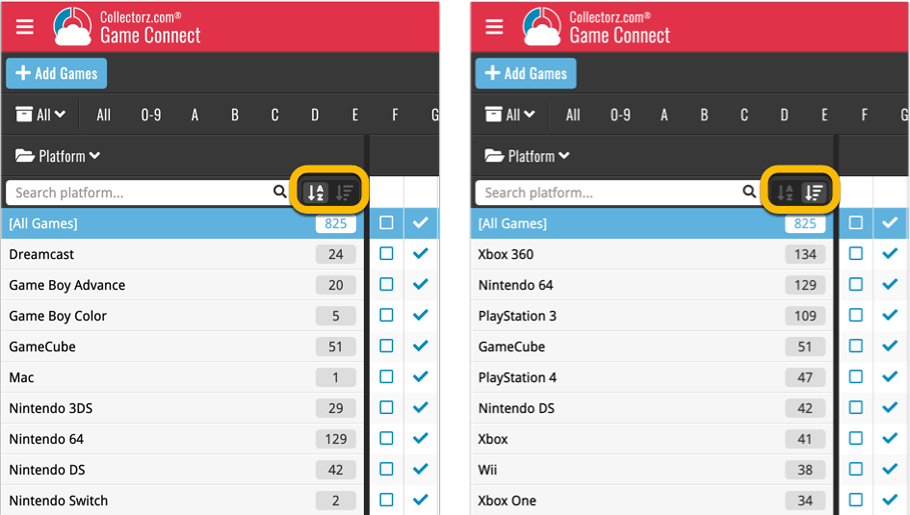
A useful and fun new option in Game Connect software today!
By default, the folders in your folder panel are sorted alphabetically. But as of today, there is another option: sort your folder panel by the numbers, that is by the number of games contained.
Sorting by the numbers is a nice way to find the most important Platforms, Developers, Genres, etc.. in your collection.
Switch between the Alphabetical and Number sorting using the new toggle to the right of the search box:
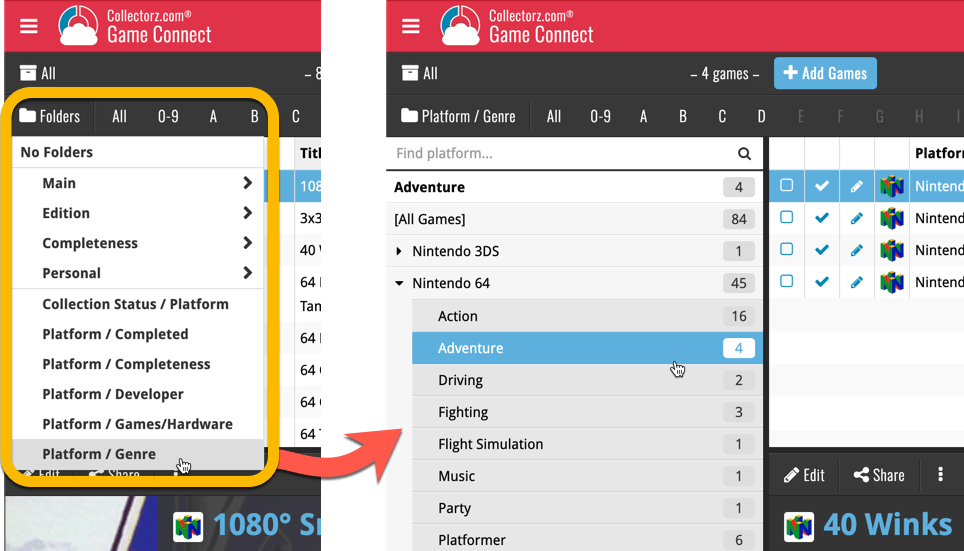
Roughly a month ago we introduced the ability to use multiple levels of folders in the folder panel. At the time, limited to several built-in field sensible field combinations.
Today we’re giving you the next logical step: the ability to create and save your own multi- and single-level favorites for the folder panel.
The Favorites are shown at the top of the Folder menu, with the single-field options still available at the bottom.

Two updates for your Connect software today. An improved Statistics screen, with cool new charts and lists, plus a re-designed toolbar that clearly shows your currently selected folders and filters.
A very cool and useful addition to your Game Connect software today: the folder panel on the left now allows multiple levels of folders!
This is a powerful way to browse your game collection, e.g by Platform then Completeness, or Collection Status then Platform.
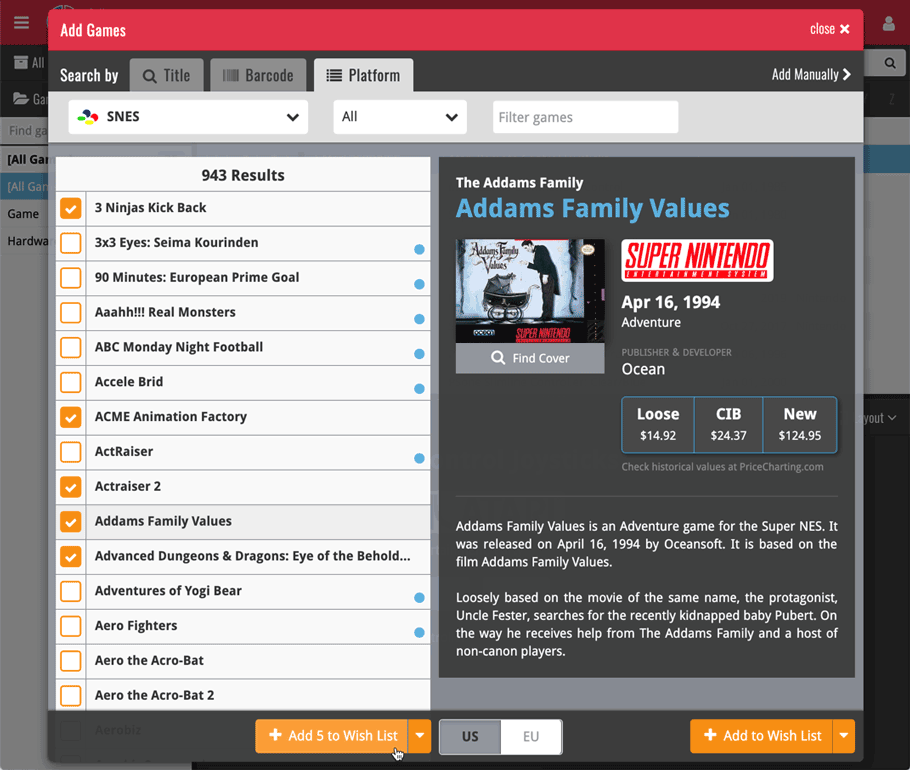
Another cool update for Game Collector, bringing you a new super-quick way to add games to your database: a new Add By Platform tab in the Add Games from Core screen.
Just select a platform and it will show a full list of all games available on that platform. Now just checkbox the games you own (or want) and use the big Add button at the bottom.
The new By Platform lists is the perfect tool for platform completionists:
The list clearly highlights the games you already have In Collection or On Wishlist. Or use the Not in Collection filter to show only the ones you are still missing.
Using the “Not in Collection” filter:
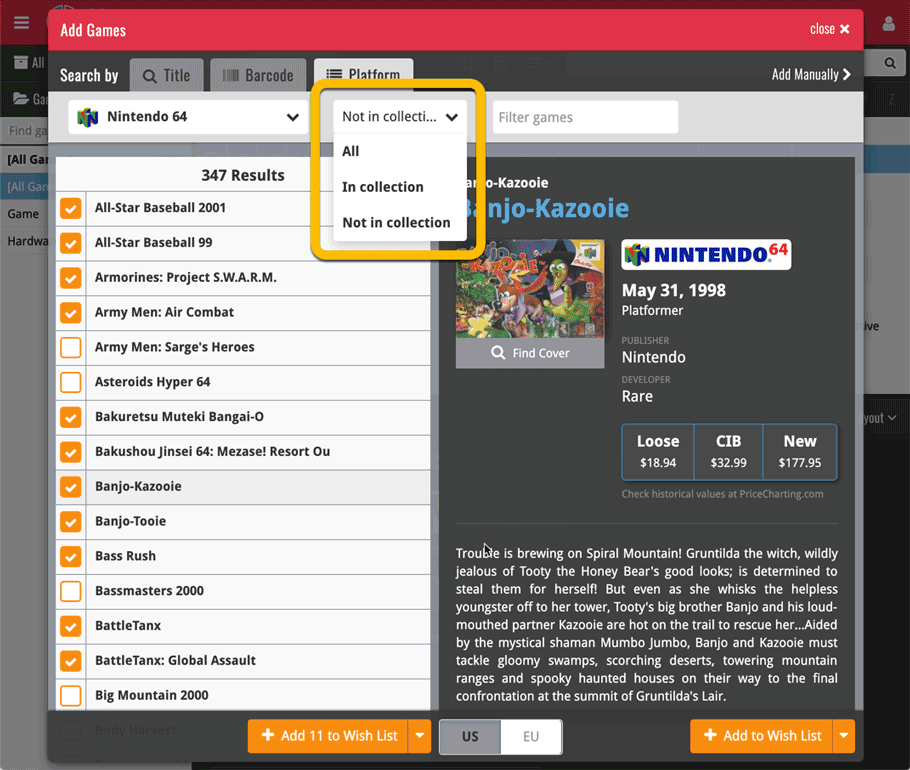
Tip: use the search box on the toolbar to quickly filter the list:
Today, a subtle addition to your Game Connect software, but one that can save you a lot of time if you’re always adding your games by barcode:
A new “Add [..] to Collection” button under the add queue, that lets you add all scanned games in one go. No more need to click the little “+” buttons for each entry.

Some other improvements:
At the same time, some other tweaks went live in your software:
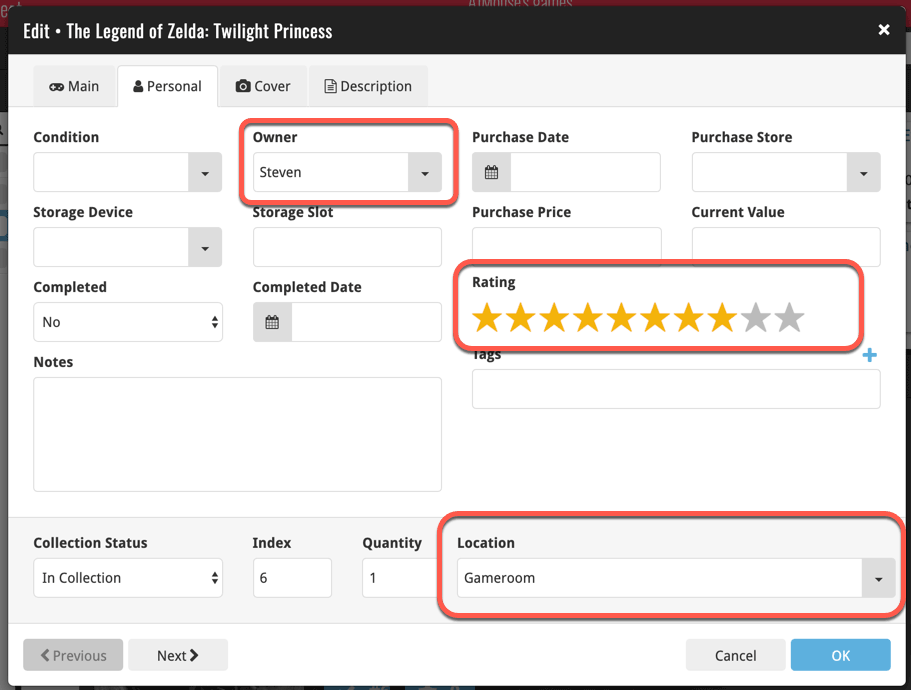
- In the “fixed” area at the bottom of the Edit Game screen, we replaced the Owner field with the Location field.
Through user feedback we found that the Location field is used by many more users, compared to Owner. Also many new users were not finding the field. So we figured the Location field deserved a more prominent spot in the Edit Game screen.
BTW: the Owner field can now be found on the Personal tab. - The User Rating field has received a make-over and can now be set using a nice sliding star thingie.
The Game Connect software has allowed you to add your gaming hardware (consoles, controllers, etc…) to your database for quite a while. However, that has always been manual entry. Not surprisingly, one of the top feature requests for our game database solution has been the ability to add hardware automatically by searching an online database.
So… that is exactly what we created for you!
- First, we set up a separate database in our Core for gaming hardware, with all the right fields.
- Then, we created a in-house CMS tool for actually filling that hardware database.
- At that point, the big project started for our content managers: finding console and accessory information online and manually filling the database with as many consoles, controllers, light guns, etc.. they could find. All with descriptions, box images, device images, backdrop images, sometimes even YouTube promo videos.
- After many months work, our hardware database now lists 1500 console editions and just over 500 controllers.
- So it is finally time to release our new “Add Hardware from Core” feature!
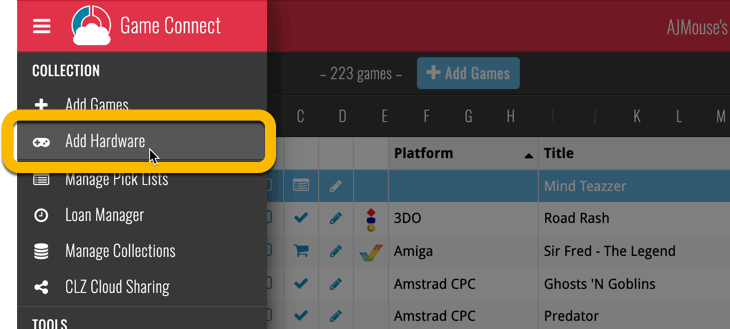
Add Hardware
Find the new Add Hardware screen by opening the menu and click “Add Hardware”
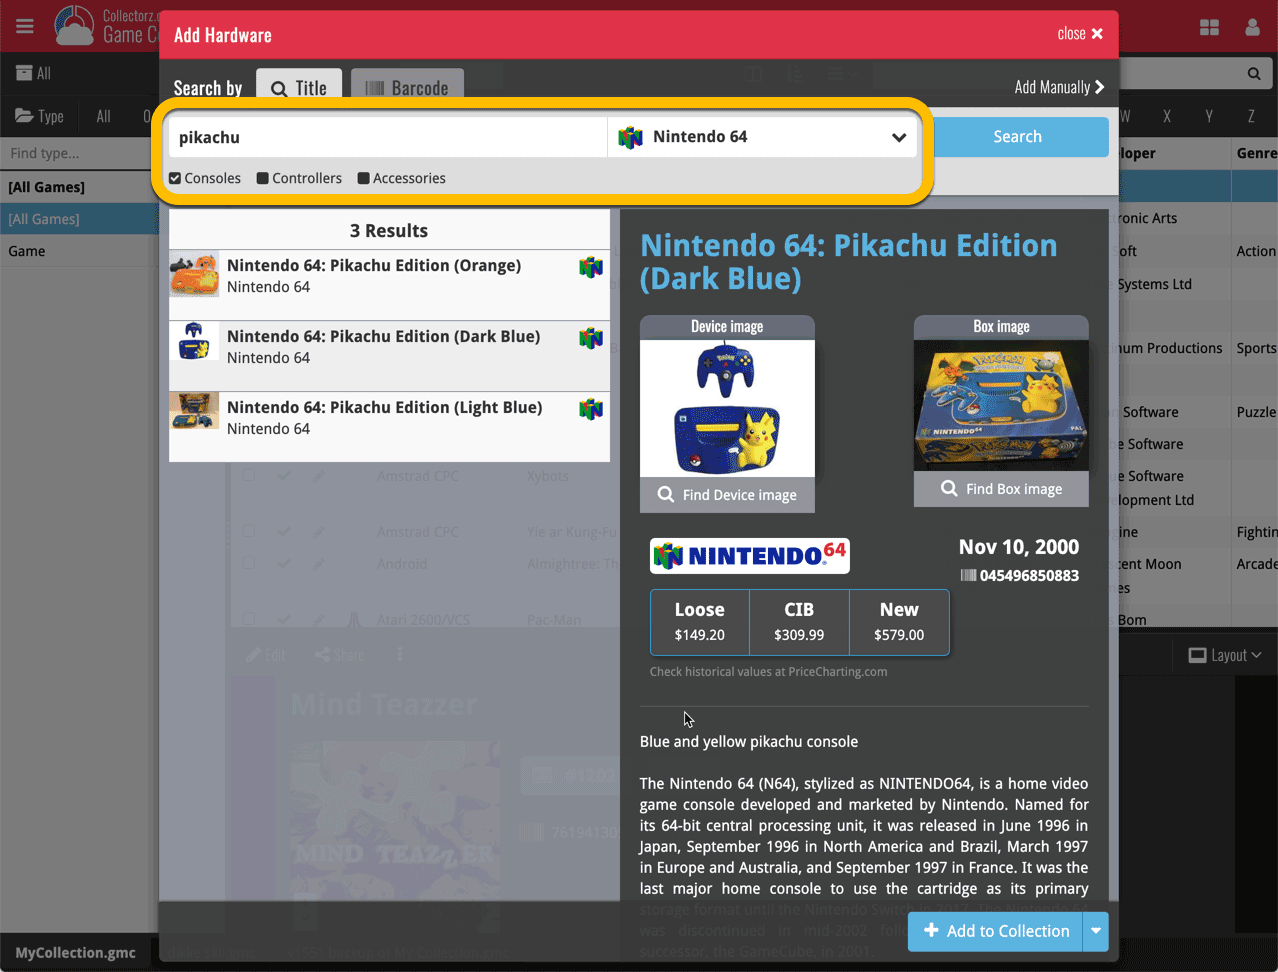
Add Hardware by title
This screen should be familiar to you as it works the same as the Add Games screen. Start typing the title of your hardware item, and pick it from the Search-as-you-type” suggestions.
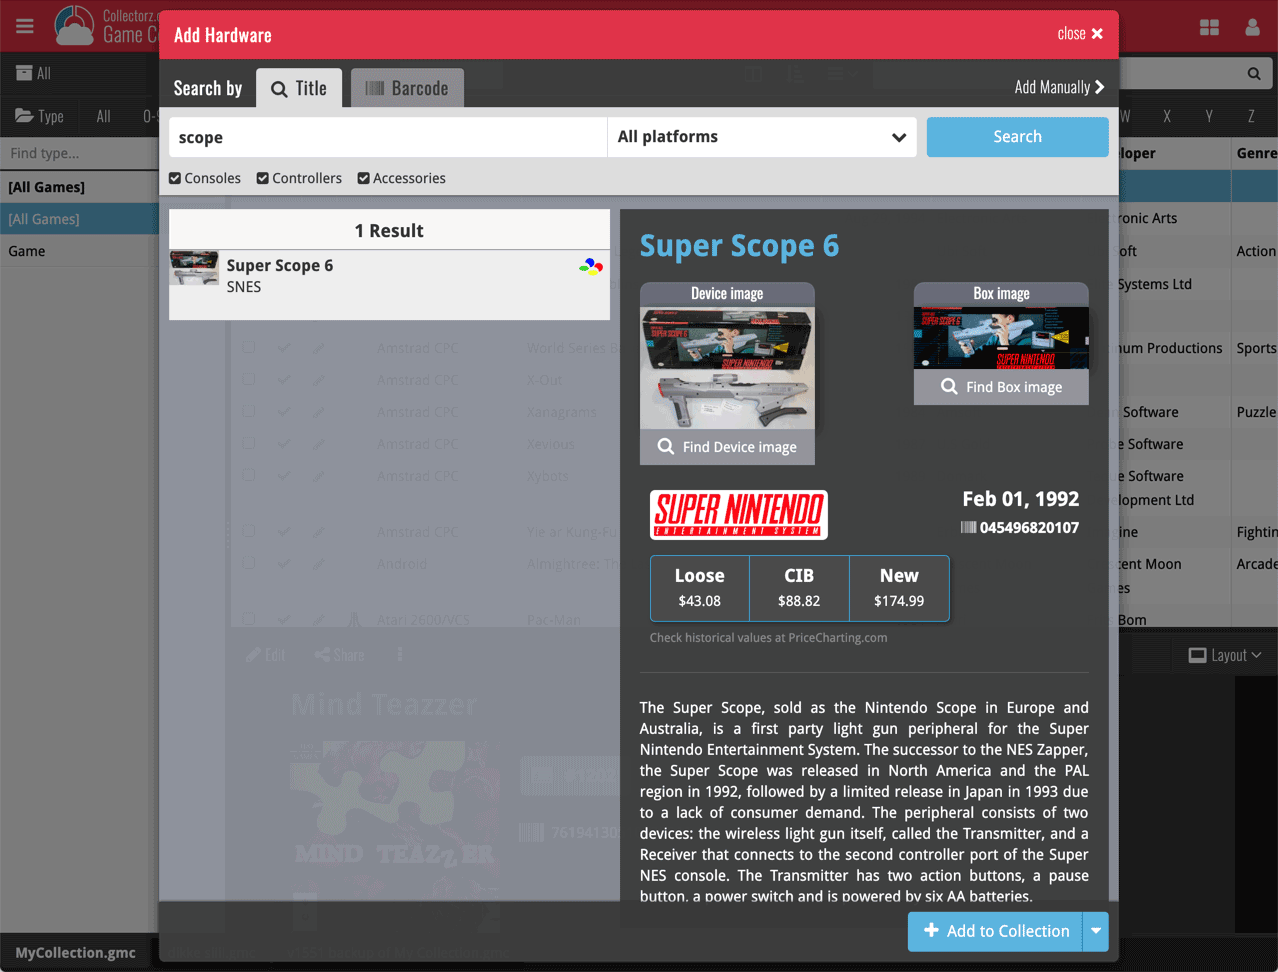
Or refine your search by setting the type of hardware and picking a platform:
Add Hardware by barcode
You can also find hardware by scanning barcodes via the “Barcode” tab. Scan a bunch of hardware items and add them!
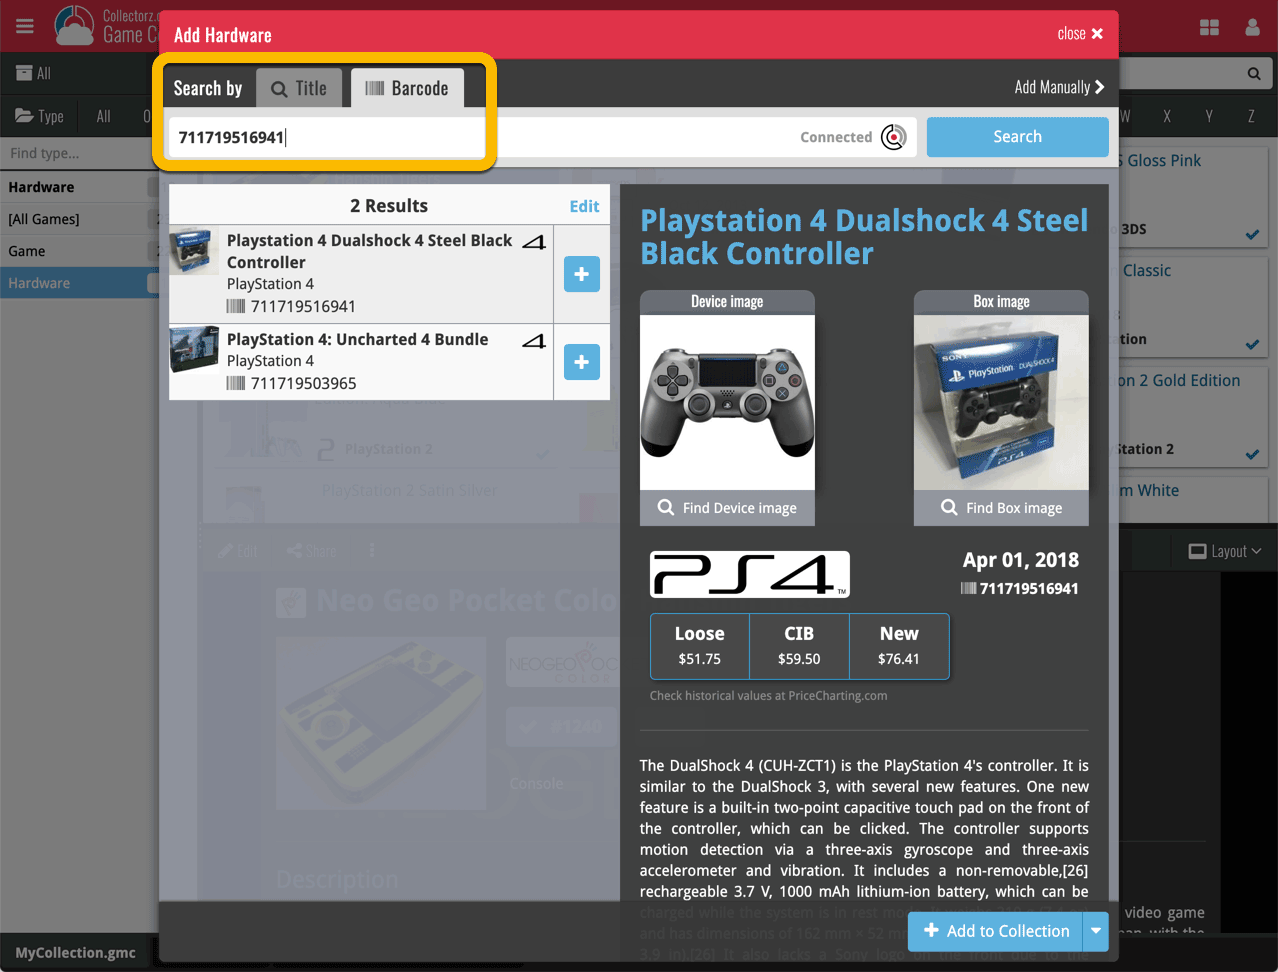
TIP: Use CLZ Barry to quickly scan a bunch of barcodes here!
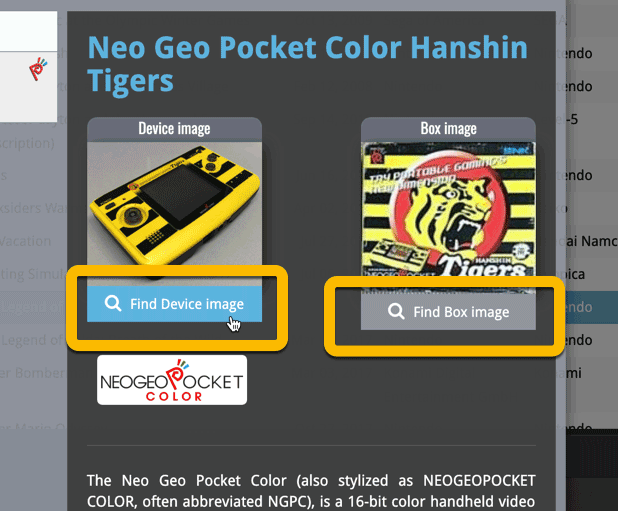
Find Device and Box Image
Use the “Find Device image” and “Find Box image” buttons if you want to find a different image!
Add Hardware Manually
If you can’t find your hardware item, you can click the “Add Manually” button top right and fill in all details of the hardware item yourself.
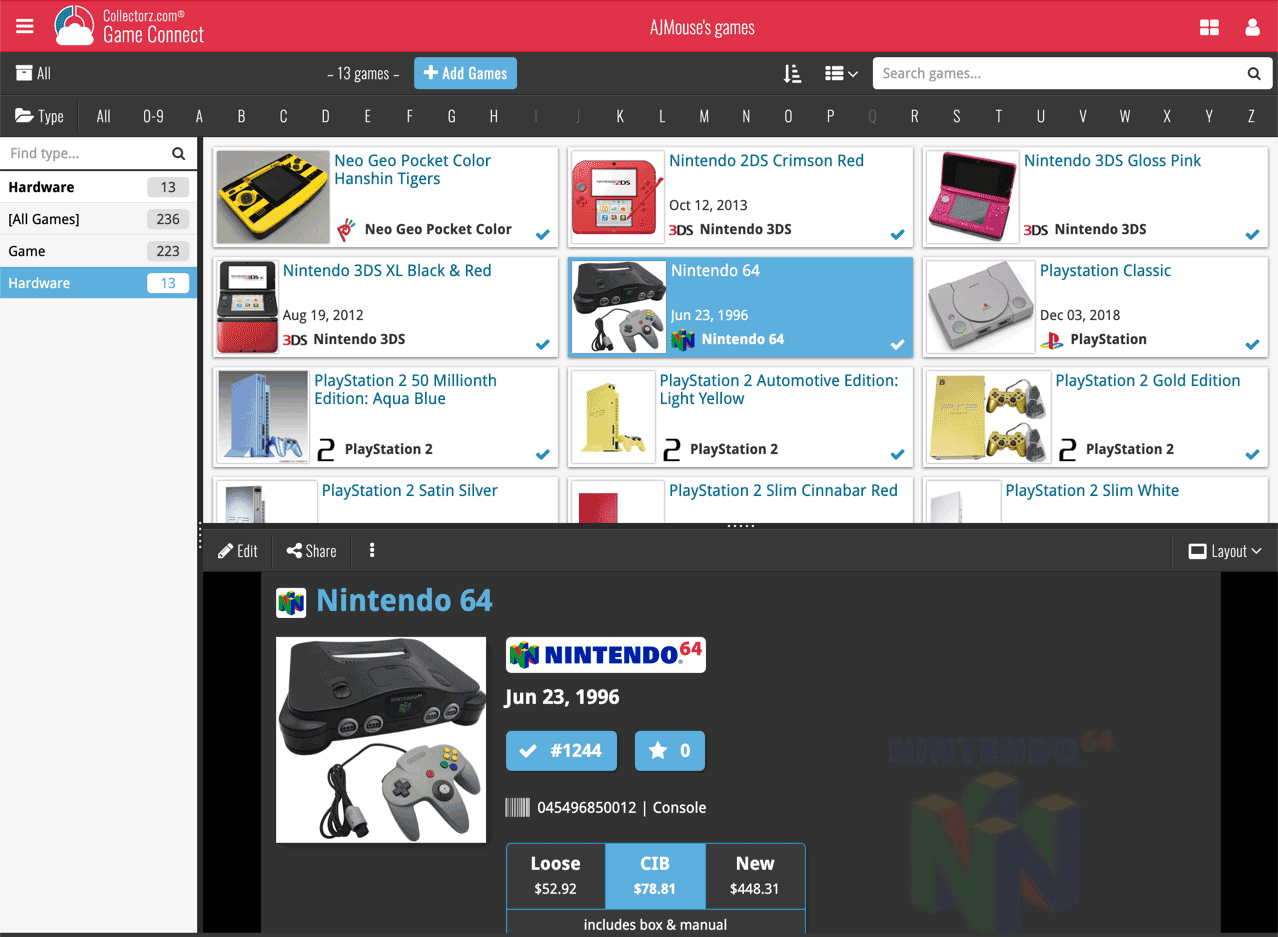
Hardware in your collection
Hardware has been a part of our programs and Game Connect for a while. You can edit hardware the same as you can edit game, and you can now add two images (device and box image) to them.
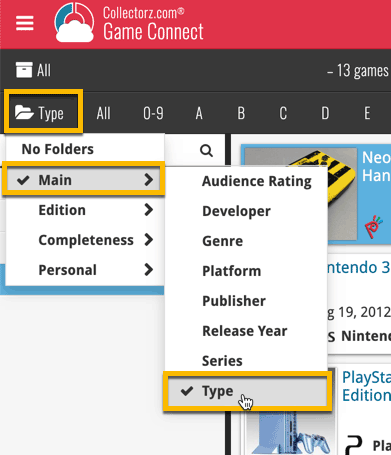
TIP: To quickly group on hardware, click the folder button and go to Main > Type.
And the result:
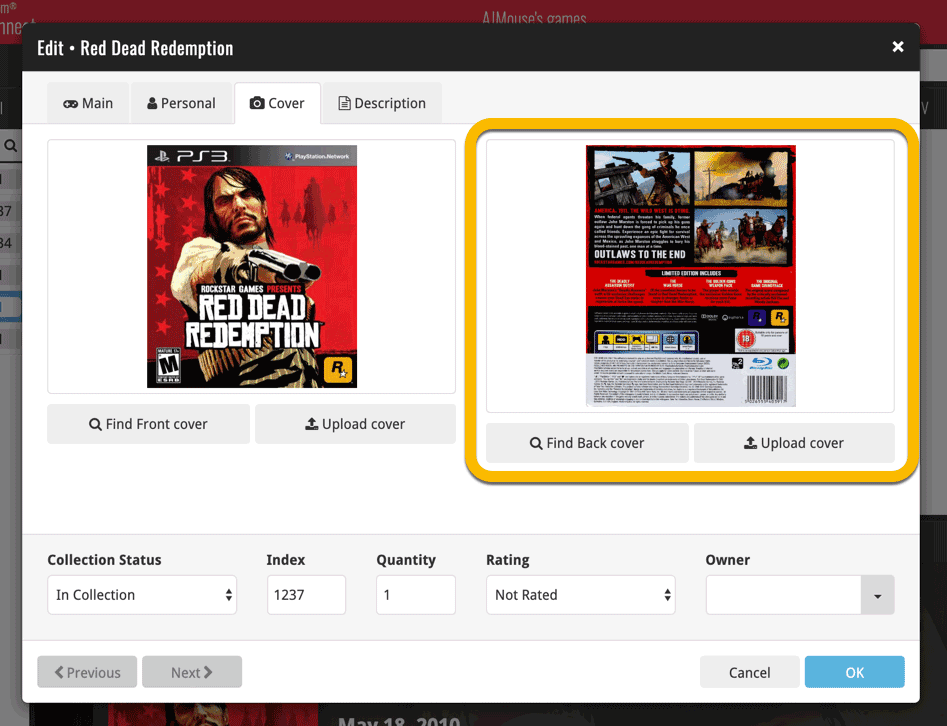
New: Add your own back covers
With this big update for Game Connect we have another surprise for you: Back Covers! That’s right, a brand new back cover field you can modify yourself!
Use the “Find Back cover” button to find one, or upload one yourself:
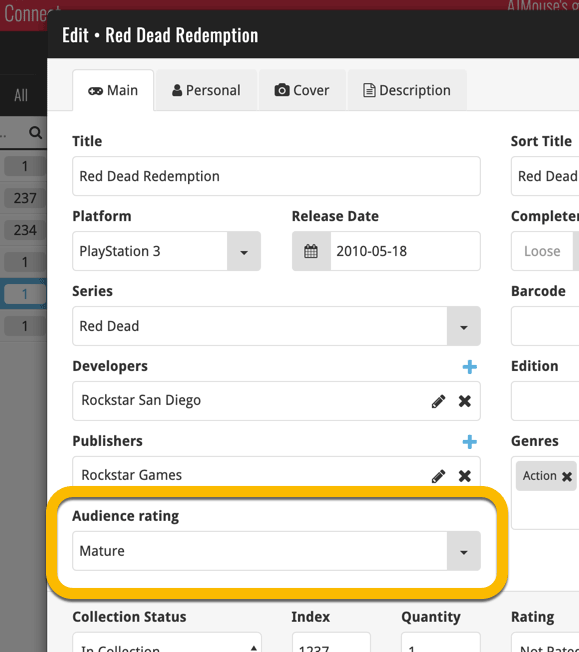
New: Edit the Audience Rating field
Audience Rating is now a field you can edit yourself. So for all your games, you can edit and modify the Audience Rating field now, to anything you like.
We’ll be adding the audience rating and back cover fields to the sync of all other Collectorz.com game products in the next couple of weeks. Back covers (editing and syncing) will also be added to the Collectorz.com Movie, Book, Comic and Music products.
Based on user feedback we found out users were looking for and expecting a tool to find duplicate entries in their collection. Some way to find out if you’ve accidentally added multiple versions of the same game, but perhaps with a different format or barcode.
After quite a few requests and discussions with users about this, to find out how they got duplicates and what they would expect from such a Duplicate Finder tool, it’s here today: Find Duplicate entries in your collection!
New: Find Duplicate Games
Open the menu top left and select Find Duplicates to begin.
Then select which field to find duplicates on. You can find duplicates based on:
- Title
- Title & Platform
- Barcode
- Index
Click “Find Duplicates” and see what it comes up with. Use the blue “Keep” button to keep a group of duplicates, or use the red “Remove” button to remove a duplicate!
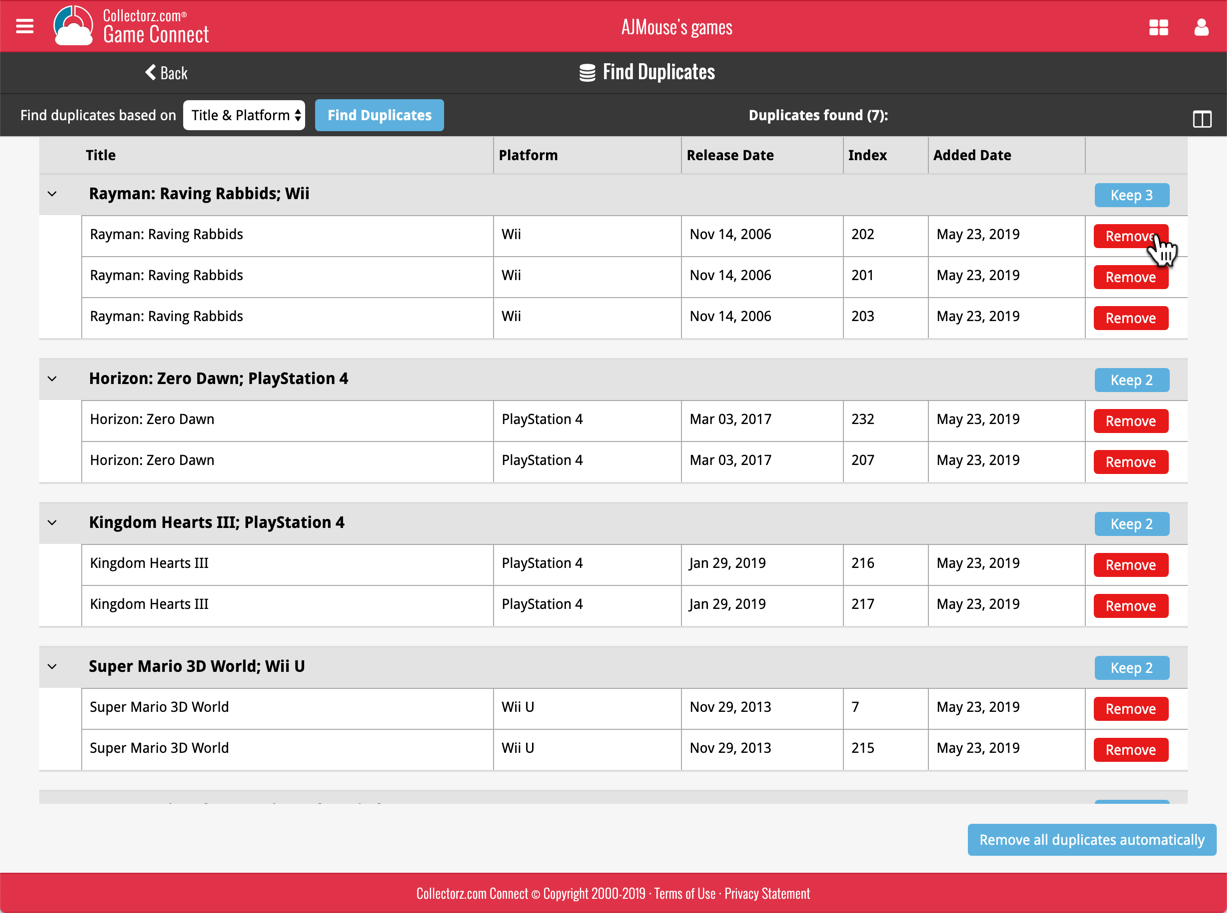
If you click “Remove all duplicates automatically”, it will remove all duplicate entries and will only keep 1 single entry (the oldest one) in your collection.
Tip: use the columns button, top right, to set up the columns you’d like to see!
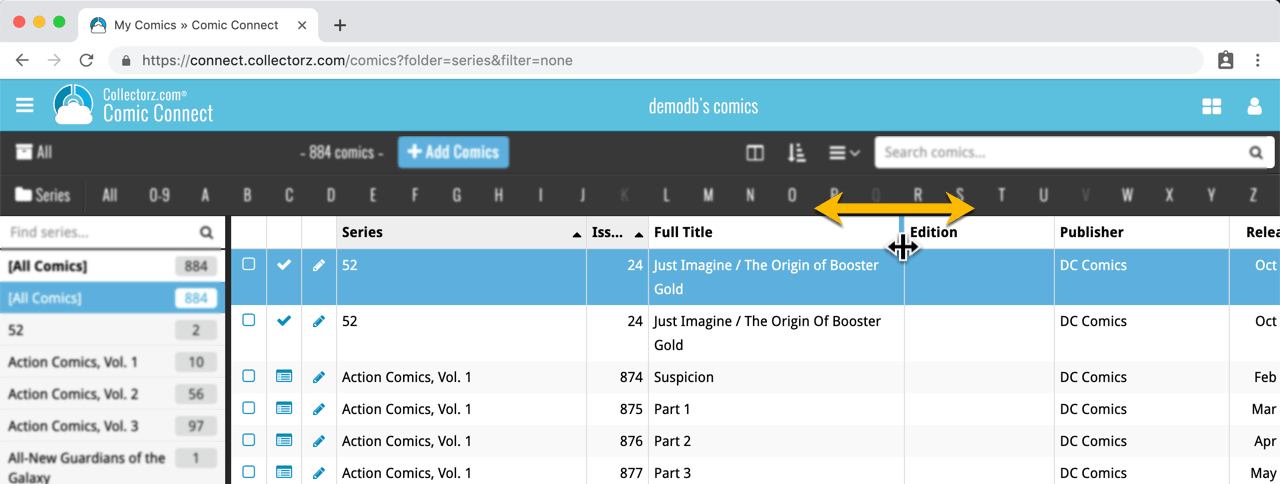
Another big step forward for our cloud-based Connect software, making it even more customizable:
The columns in List View are now resizable. That is, you can now change the width of the columns by simply dragging the dividers between the column headers. Hover your mouse over the divider and it will turn blue, then drag it make the column wider or narrower.
TIP: double click the divider to make the column auto-size to its’ current content!
See it in action:
Do you prefer the automatic column widths, the way it was before? No problem, just go to the Settings screen and enable the “Size columns automatically” settings.
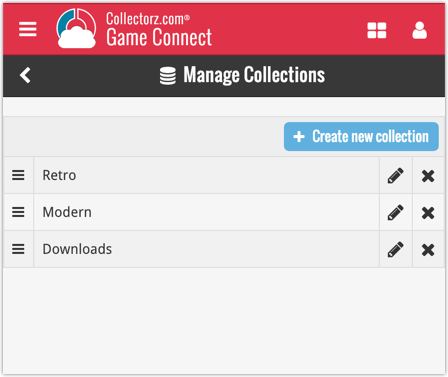
You can now manage multiple sub-collections within one account. The collections will appear as little tabs at the bottom (e.g. like in Excel), so that you can easily switch between them.

Create and manage collections
Open the menu top left and click “Manage Collections” to:
- Create new collections
- Rename existing collections
- Remove collections
- Change their order (drag and drop)
Note: the CLZ mobile app currently does not support multiple collections yet (coming soon!). For now, you CAN sync multiple collections to the mobile app, but they will appear mixed together, as ONE database.
New: Notes as a column
The Notes field can now be added as a column in List View:
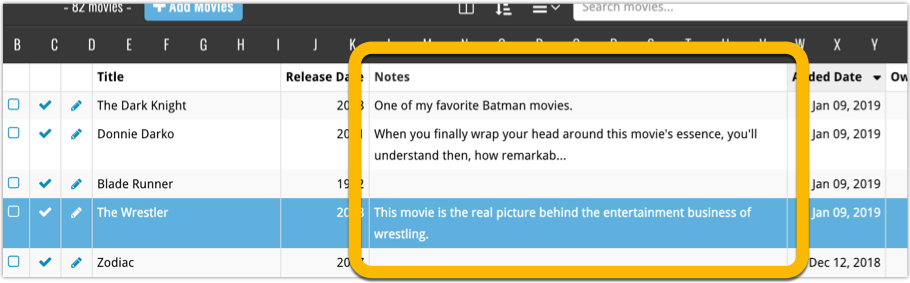
(example screenshot from Movie Connect)
Another useful addition to your software today, as we added a Quick Search box in your folder panel.
Especially useful for those long folder lists, e.g. when using Platform as the folder field. Just type a few letters of the platform name and the folder list will instantly “filter down” to the matching platforms, while you type!
See it in action: